Materials: ¾ yard heavy velvet fabric.
Time: 40 minutes

We had a little B diaper malfunction on my desk chair the other day. A frantic hubby was about to reach for the cleaning supplies, but I stopped him midway. The desk chair was pretty ugly and I had been contemplating reupholstering it for a while since. This was the perfect excuse, so I quickly unscrewed the seat and ripped off the soiled fabric. Because of the urgency of the situation I do not have a “before” picture. It was a drabby, officy-looking chair my hubby probably bought for $10 at a used furniture store before we were together. Note: the soiling did not transfer to the cushion underneath. I have no idea what that stain is on the side of the cushion.
I went to my local fabric store and saw the most beautiful velvet in the perfect color I was looking for, a grayish sage green, and it had very fine lines in its texture. Very luxurious! I chair in this fabric would have been pretty pricey. Luckily this roll was 20% off, so I was able to purchase all I needed-and-more for $18.56.
I dismantled the chair and proceeded to trace the outline of the back support on the back of the fabric. This is the only part of the project that required any sewing. Next I sewed both sides using my awesome new walking foot. I turned it inside out and slipped it over the back. It was a really tight fit, perfect, just what I was aiming for. After snipping the bottom of the fabric off, I took a staple gun and stapled the front side of the fabric to the wood back of the back support. Next I took fabric glue, and tucked the back side fabric and glued it. I had previously tried stapling it underneath the wood back, but the fabric was too thick and the staples were not going through enough. Next I stapled it down anyways to help the gluing process. I ended up just leaving it as is. We’ll see how long it will hold.


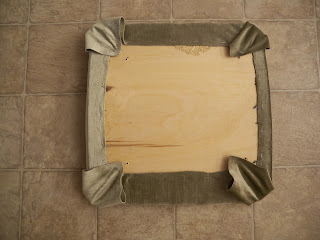
Finally I took the bottom seat and measured the fabric to cover it. This part was a piece of cake. I just tucked the fabric underneath and stapled away. For the corners I used multiple staples and bunched it up so that there was no obvious main fold, but a series of small folds around the corners. I then took the piece of cardboard that was previously underneath the seat and stapled that on top. After screwing both parts back on, I had a gorgeous expensive-looking new desk chair!


More pictures of our bedroom to follow: I have a few more design projects I’m working on.

No comments:
Post a Comment
Thank you for your contribution!